This page is no longer updated, as the game has changed since this page was created. Unless someone still have a character in the old villain side tutorial, I suppose . . . It will remain, to show how things used to be.
This character creation help guide for the City of Villains AKA CoV was created primarily for the people I played the game with, but, other people who play the game are welcome to use this guide too, as it'll provide a lot of helpful tips for creating a new character. Its design is as simple as I can make it without any Flash, javascript, or fancy scripting like I use on some of my other pages, so it won't be too taxing on people's computers if they want to look at it while playing the game.
It's advised that you only link to the page itself, not to the individual sections, since they'll likely change.
")
In the Table of Contents below, you can click on either the thumbnail picture or the text link to view more information on the subject mentioned.
Table of contents
Server selection screen: Pick a server How to pick the server that you want to use and information that may help motivate your choice.
Character creation: Choosing an archtype How to choose an archtype and what the choices are.
Character creation: Choosing an origin How to choose an origin and which ones may be best as a first-time player.
Character creation: Primary power set Your primary power choices.
Character creation: Secondary power set Your secondary power choices.
Character creation: Body types Your body type choices, where you can choose gender, height, and build.
Character creation: Creating your costume You can choose a costume for your character from the costume sets or create something that's totally unique.
Entering the game: City of Villains tutorial Breaking your character out of the zig prison in the City of Villains tutorial zone, Breakout.
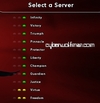
Which server to use? When you log into the game, you'll need to decide on which server to use. Some servers are more populated than others, and many choose them, while other servers have fewer people on them and some people prefer them for the relative quiet. The servers that are between the busiest and the most quiet are prefered by others for a good balance.
In the server selection view, you'll see a list of servers to choose from. How busy they are is indicated by the color of the dot in front of each server, which is grey for off-line, green for on, but not very busy, yellow for more busy, and red for the busiest. Since you're just starting out, you might want to choose a really quiet server to create your first character on so you won't have as many distractions from other players, as you're learning the basics of how to play the game and getting used to the interface.
:+: Top of page :+: Back to Table of Contents :+: Other pages :+:
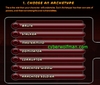
What archtype do you want to play? After you've clicked on Create Character, you'll be asked to choose an archtype. When you click on each archtype, information about it will appear below your selection. However, you won't be able to create an Arachnos Widow or Arachnos Soldier (which are known as VEATs in the game) until after you've gotten a villain to level 20, and logged back into the game. This used to be set at level 50, but, they lowered it to level 20.
For a first character, you might want to try a brute, which is primarily a character that can take a lot of damage (and is called a 'meat shield' by some, and a 'tank' by others) and uses mostly
melee attacks . The other characters have different power types, and more things that you'll need to pay attention to. For instance, a stalker is another type of melee damage character, but, they also can hide from their enemy, and if you attack while hidden, you can do more damage, but, they also have lower hit points, so you can't take as much damage as the brute.
:+: Top of page :+: Back to Table of Contents :+: Other pages :+:
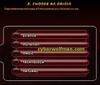
Which origin do your powers come from? After you've chosen an archtype, you'll be asked to choose an origin that your powers have come from. When you click on each origin, information about it will appear below your selection. For the most part, which origin you pick won't matter very much except for the store's location.
Most of the time, I choose the mutation origin AKA mutant origin because the first store that sells the mutation origin enhancements for the powers is the closest origin store near the ferry when you first enter the zone called Cap Au Diable (just be careful of the enemy NPCs that wander by sometimes!), and in the lower levels, you don't have a travel power, unless you buy the
Raptor Pack from the Jet Pack Vendor in Grandville for 10,000Infamy , or get rewarded with it by successfully completing the Atlas Park mayhem mission between levels 5 to 10.
:+: Top of page :+: Back to Table of Contents :+: Other pages :+:
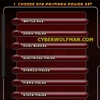
Choose your primary power set After you've chosen an archtype and origin, and hit the Next button at the lower right-hand part of the window, you'll be taken to the next screen, where you'll be asked to choose a primary power set. When you click on each power set, information about it will appear below your selection. You can also see the detailed information for each one by clicking on the button at the top of the other column, and compare recharge times, damage done,
endurance cost, and any other effects the power has.
Each of these, as you'll note from the description below as you pick one of the power sets, has their own qualites. However . . . Many people choose powers that will be of most benefit to them when first starting out. One thing to consider is the fact that some powers like Energy Melee only have a chance to do what they're known for, namely, disorient. You can check this for yourself by clicking on the Energy Melee power set choice first, then the Show Detailed Info button in the middle of the screen and the put your mouse over a power such as Barrage, and you'll see in the left side of the screen, that there's only a 10% chance for it to disorient your opponent. Other powers in the set have a higher chance, but, you can't choose those powers until later in your career as a villain, whereas other power sets do have the effect on their enemy that the power sets are known for, such as Dark Melee's ability to debuff your enemy's chance to hit you, that start with the first powers. Dark Melee also offers you a way to heal yourself from your enemies, when other primary power sets don't. While you're looking at the details of the powers, be sure to notice things like their recharge time. As a brute, you'll want to hit your enemy as often as possible especially when each of those Dark Melee attacks lowers the chance that the enemy will hit you in return, and Shadow Punch has a three second recharge rate whereas Smite takes six seconds to recharge.
:+: Top of page :+: Back to Table of Contents :+: Other pages :+:
Choose your secondary power set After you've chosen a primary power set and your first power, and hit the Next button at the lower right-hand part of the window, you'll be taken to the next screen, where you'll be asked to choose a secondary power set. When you click on each power set, information about it will appear below your selection.
Each of these, as you'll note from the description below as you pick one of the power sets, has their own qualites. However . . . Hee hee hee . . . Some people like Stone Armor for the high defense and resistance you get from the Granite Armor power. But. You can't get Granite Armor until level 38, and, when you use it, your run speed is decreased by 70%, your power recharge rate is decreased by 65%, you can't jump, you can't fly, and your damage is decreased by 30%. LOL For the first-time player, Energy Aura may be the best choice. Others may think this is a silly choice, but, when you consider the fact that this power set includes a stealth power (Energy Cloak, available at level 20), fairly good defenses to everything but psionic damage, and, with the Energy Drain power, that you can pick at level 28, you can recover about 25% of your Endurance off of a single enemy, and it automatically hits them every single time if they're within 10 feet of you and can't phase-shift or something like that. You might want to skip the powers Dampening Field and Energy Protection, though. 7% to 10% resistance to only a few damage types isn't worth spending a power choice on.
:+: Top of page :+: Back to Table of Contents :+: Other pages :+:
Choose your body type After you've chosen a primary power set as well as your secondary power set, then hit the Next button at the lower right-hand corner of the window, you'll be taken to the next screen, where you'll be asked to choose a body type.
You can pick either male, female, or huge (which only comes as a male gender body type for some reason, with no female version of huge.
Fezzik would be so disappointed). Below the gender choices, you can choose your character's height. I recommend something between 5 feet and 7 feet tall for best views while in some of those cave missions as you play the game. If you make your character too tall for your taste, and find out about it later, you can't change it at the Tailor. You have to buy the City of Heroes Super Booster III: Superscience and go to the Super Tailer near the Tailor to do it. So, I'm hoping I just saved you some real world money. :-) Below the height slider, there's choices for Slim, Average, Athletic, and Heavy. These are just an overall proprotion kind of thing that you can see presented on the far right side of the screen on your character's body, itself, as you choose them. You'll note that the different sliders will move as you pick each one. These can be further adjusted after you've chosen your default build, but, I recommend that you wait on using those sliders (except for the height slider) until the next screen when you can better see what your character will look like after you've chosen the costume that they'll wear.
:+: Top of page :+: Back to Table of Contents :+: Other pages :+:
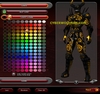
Create your costume After you've chosen your powers and body type, you can create your character's costume, using mostly drop-down lists and color selections.
On the left side of the screen, you'll have a number of drop-down lists to click on. The first one at the top lets you choose a costume set. The one selected in the picture is the Villain costume set, with only two colors selected for the entire costume. But, there are many more to choose from. As your first character, you might want to go ahead and use one, just to get started, then, later, with another character, choose a costume set that's closest to what you want, then customize it using the various other drop-down menus below the Costume Set drop-down menu. In the colors section, you can choose a color for the skin color of your character, and can even give them purple or green colored skin. To change between the colors of your skin to the colors of your costume, click on the Colors Linked bar to choose your costume colors. If you want a different skin color, click on the Skin Color bar. If you don't want to be limited to only two colors for your entire costume, un-select the Copy Current Colors Across Entire Body button below where you see all the colors to choose from. Then, you can pick different colors for each part of your costume after you've selected it from the drop-down menus on the left such as Hair, Shoulders, Gloves, and Belt.
If you like, you can adjust the proportions of different parts of your character's body by clicking on the Scales bar below the color selections.
Bored with the drop-down menus and want to try something really different? Click on the Random button. If you want to go back to a more normal appearance (*yawns*) after looking at some randomly chosen costumes, hit the Clear All button or choose one of the costume sets in the Costume Set drop-down menu.
Before leaving this screen, be certain that the look you've chosen is the look you want, and you've adjusted the sliders to what you want them at in the previous screen, because it may be some time before you can change it, and, when you do, it'll cost you Infamy, unless you have a free Tailor session.
After you've made your choices, and click the Next button, you'll be asked to choose a name for your character. Please note that if you choose a copyrighted name or something offensive you might get your name genericized, and your name will become something like Generic 123 4567 or somesuch. You can ignore the Character Description and Battle Cry fields for now. They can be edited by you after you've got your character into the game, if you so choose. You'll next be asked if you want to enter the tutorial zone. If this is your first character, you should choose the Yes button.
:+: Top of page :+: Back to Table of Contents :+: Other pages :+:
City of Villains tutorial Learning the basics in the City of Villains tutorial, Breakout, setting some options, and getting an easy exploration badge.
Now, it's time to break your character out of prison! LOL The City of Villains tutorial is the Zig (short for ziggurat, which is kind of what it looks like on the outside), and is where you'll learn the basics of the game interface. But, first, a few things you might want to do. In the bottom of your screen, there's a chat window. Hit the Enter key or click inside the field where it says something like Chat: or whatever, and type in "/hide" (without the quotes), and, when the little pop-up window comes up, at the very least, select the "Hide from Searches" to give yourself some peace from spammers in the game.
For more options to play with, click on the word Menu at the top right-hand side of your program window, and, in the drop-down window, choose the word Options. For now, you may only want to change a few things, such as things in the General tab and in the Chat section like changing Individual Name Colors to Enable by clicking on that word and then clicking on the Apply Now button at the bottom of the Options window. If you'd like, you can also change things in the Miscellaneous section such as ToolTip Delay to 1% so it'll pop up with information when you put your mouse over some of the things in your program window. To avoid teammates teleporting you off the top of buildings, later, you can also change the Prompt Team Teleport to Enable. ;-) Under the Control tab, it's a good idea to adjust the Turning in the Control Sensitivity section higher than 500% so your character turns around faster if you have a fairly good video card. In the Graphics and Audio tab, you can scroll down to the Chat Bubble Color section and use the sliders to change the color of your chat baloon text and background, and how it'll display in the City of Villains game above your character will be shown below the sliders. Click the Apply Now button when you're done with your selections, and hit the little dot with the x in it in the corner of that Option window to close it.
Now, for an easy exploration badge . . . If you're still at the spot where you entered the tutorial section, click on H.T. if he's not already selected, so you have him in your Compass at the top of your window, then, use the direction arrows to move to the base of the ramp that's south of him, and go up it, to the top level, where you'll see numbered cells to your left as you get to the top of the ramp, with cell 12 being the closest. Now, go down the walkway to cell 15 and walk into the middle of the cell. You'll be rewarded with the Jail Bird Exploration badge, and it'll tell you that with words flashing on your screen as well as in your upper chat window.
To see the badges your character has so far, click on Menu in the top right-hand corner of your program window, and choose Personal Info from the drop-down menu, then click on the Badges tab.
Now, walk back down the ramp to the ground level and get within a few feet of H.T. and click on him. Read the information that appears in the pop-up window, and then, click on the line Ask about available missions. Accept the task, and complete the mission objectives, then return to him. He'll then introduce you to somebody else, who will also give you mission. Reading all the information in these pop-ups will give you the very basic info of the main interface points of the game.
You might see other players running around in the tutorial with you. They can't attack you, and you can't attack them. And, until you get out into the prison yard, nothing else in the game can attack you, either.
There's only seven contacts that you will get missions from in the tutorial for your character, and only a couple of them ask you to do one or two really easy missions (not counting the 'go talk to' missions) so this goes fast, and, by the time you're done with the tutoral, you're already at level 2. After you complete the mission for the Arachnos Pilot (where you'll also get your first cutscene which is like a little movie that's less than one minute duration), and return and click on him, I suggest you choose Kalinda as a contact. She's easier to find for a new user when you enter Mercy Island, and, there are no enemy near her to attack you as you're getting missions from her in person.
:+: Top of page :+: Back to Table of Contents :+: Other pages :+:
Related pages:
Copyright © Cyberwolfman™ aka CyberWoLfman™ aka Grok Wolf. All Rights Reserved.